Build a Free Dev Backend with Cloudflare Tunnel - Secure Access Without Port Forwarding
For the resourceful developer team: a practical way to make your backend accessible from anywhere, for free.
Most teams rely on cloud infrastructure to expose their development backend to the outside world.
But do you really have to?
With Cloudflare Tunnel, you can skip port forwarding, static IPs, and cloud fees.
This guide shows how to build a secure, zero-cost development environment that just works.
💡 Why Use Cloudflare Tunnel
Cloudflare Tunnel (formerly Argo Tunnel) is a free, lightweight solution that securely exposes your local backend to the internet.
No VPNs. No open ports. No firewall headaches.
Below are its key strengths and weaknesses — though in most development setups, the pros easily outweigh the cons.
✅ Advantages
- Free Forever — No monthly hosting or cloud fees.
- Enhanced Security — Cloudflare acts as a proxy that blocks DDoS and brute-force attacks before they reach your server.
Your local network remains hidden from the outside world. - No Port Forwarding Needed — You don’t have to touch your router or security team.
As long as your machine can browse the web (outbound HTTPS/443), you’re good to go. - Always On — Register
cloudflaredas a system service to auto-start at boot and reconnect if the tunnel drops.
⚠️ Limitations
- Performance Overhead — Since traffic is proxied through Cloudflare’s network, you may see 10–50 ms of additional latency.
It’s not ideal for large file transfers or streaming workloads. - Outbound Only — The tunnel is one-way; server-initiated “push” connections (WebSocket/MQTT) may require extra configuration.
- Service Dependency — You’re relying entirely on Cloudflare’s network and availability.
🧩 Concept Overview
Let’s say you own the domain acme.xyz.
You can register subdomains in Cloudflare DNS and route them to your local or internal services:
#### Route a subdomain to a local port
- dev.acme.xyz → http://localhost:8080

#### Route a specific path to another port
- dev.acme.xyz/auth-api → http://localhost:8091

#### Route a subdomain to another computer in your LAN
- thomas-debug.acme.xyz → http://192.168.1.40:8080
Now, when your app connects to https://dev.acme.xyz/auth-api,
the request is transparently forwarded to your local service running on port 8091.
Fig 1. How Cloudflare Tunnel works (source)
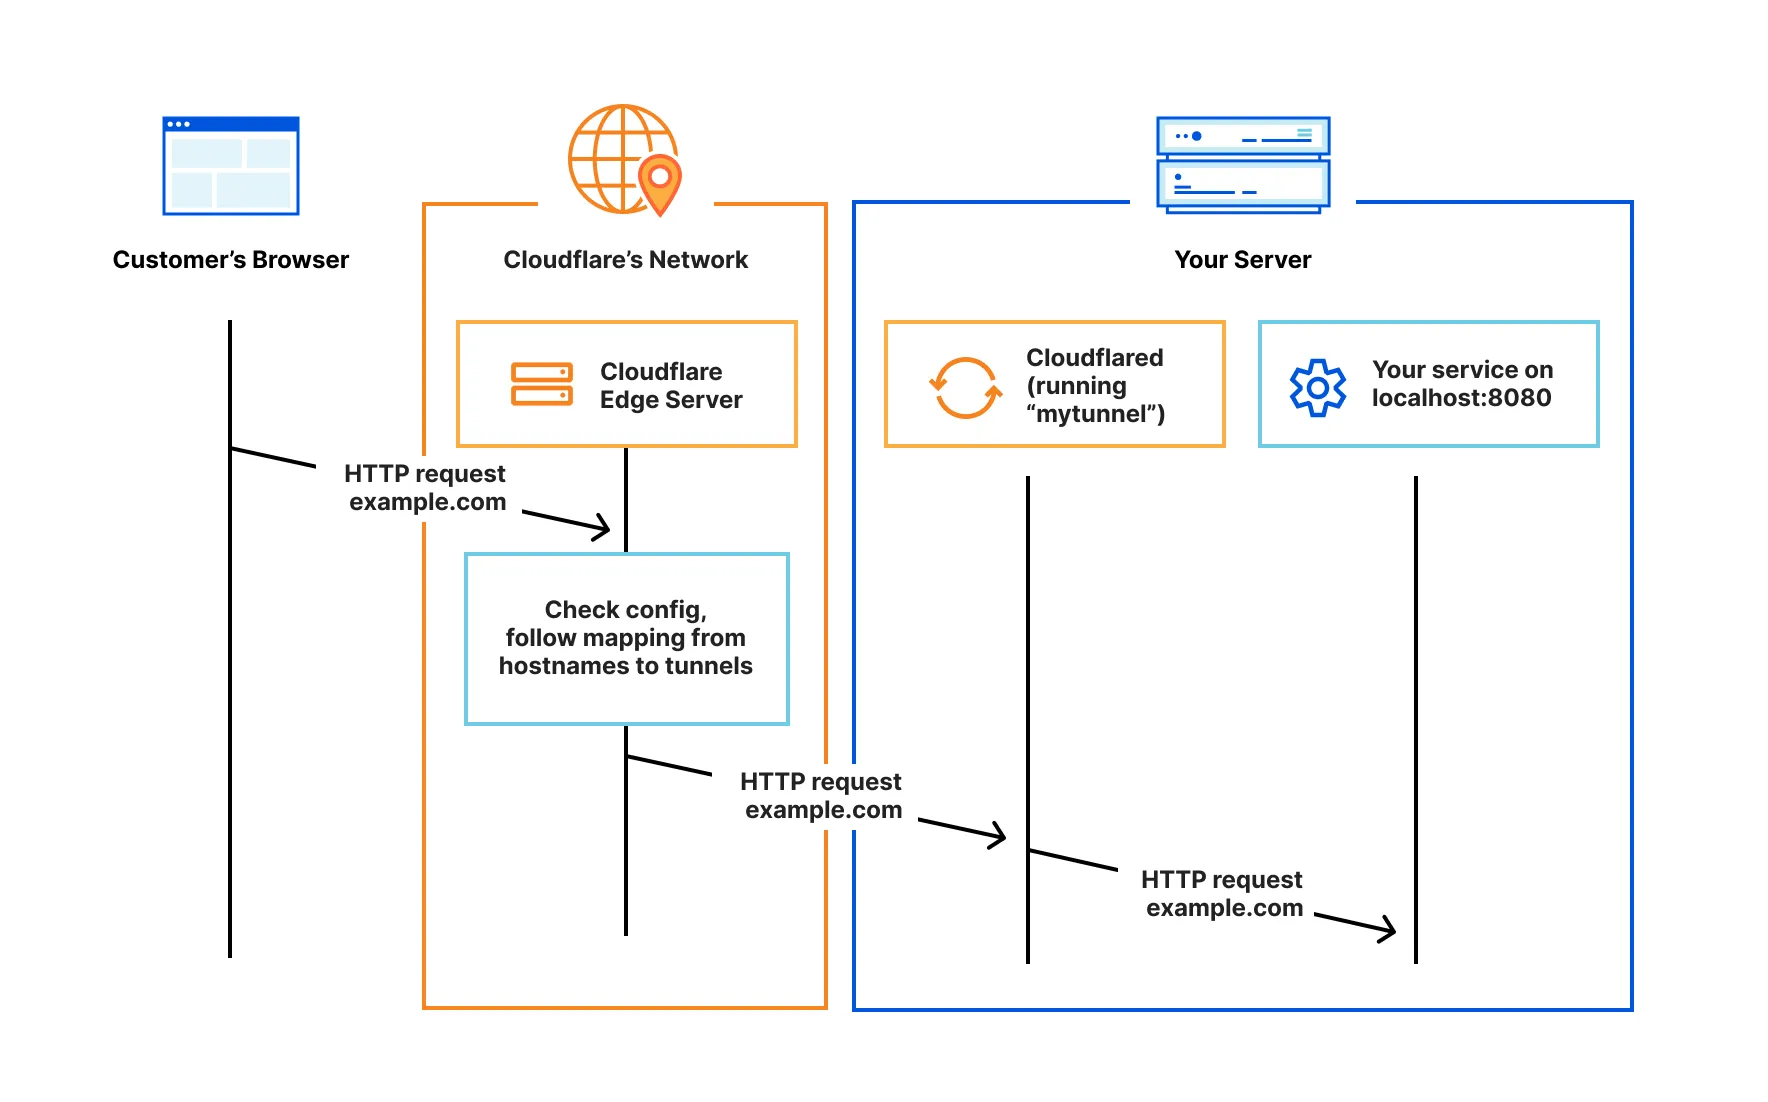
⚙️ Installation & Setup
1️⃣ Register or connect your domain to Cloudflare
If your domain already uses Cloudflare DNS, you can skip this step.
2️⃣ Install cloudflared
Follow the official installation guide.
Supports Linux, macOS, and Windows.
3️⃣ Create a tunnel and link it to a DNS record
cloudflared tunnel create dev-tunnel
cloudflared tunnel route dns dev-tunnel dev.acme.xyz
4️⃣ Configure /etc/cloudflared/config.yml
tunnel: <TUNNEL-UUID>
credentials-file: /etc/cloudflared/<TUNNEL-UUID>.json  # replace with your actual credentials file

ingress:
  - hostname: dev.acme.xyz
    service: http://localhost:8080
  - hostname: dev.acme.xyz
    path: /auth-api
    service: http://localhost:8091
  - hostname: dev.acme.xyz
    path: /post-api
    service: http://localhost:8095
  - hostname: thomas-debug.acme.xyz
    service: http://192.168.1.40:8080
  - service: http_status:404
🖥️ Run as a Background Service (Linux Example)
/etc/systemd/system/cloudflared.service
[Unit]
Description=cloudflared tunnel
After=network.target

[Service]
Type=simple
User=cloudflared
ExecStart=/usr/local/bin/cloudflared tunnel --config /etc/cloudflared/config.yml run
Restart=on-failure
RestartSec=5s

[Install]
WantedBy=multi-user.target
Commands
sudo mkdir -p /etc/cloudflared
sudo chown -R cloudflared:cloudflared /etc/cloudflared
sudo systemctl daemon-reload
sudo systemctl enable --now cloudflared
sudo journalctl -u cloudflared -f
On macOS, install with
brew install cloudflaredand start as a service:
brew services start cloudflared
View logs with:
brew services log cloudflaredor
log stream --predicate 'process == "cloudflared"'
🧠 Best Practices & Tips
- Protect your credentials file (
*.json) — restrict permissions to root or a dedicated system user. - Monitor Logs — Linux:
journalctl -u cloudflared -f, macOS:brew services log cloudflared. - Auto-Restart — systemd’s
Restart=on-failureensures reconnection after network hiccups. - Zero Trust Option — Integrate with Cloudflare Access to require authentication before allowing requests.
- Scope — Ideal for development and debugging environments.
For production workloads, use a dedicated cloud setup with load balancing.
🚀 Conclusion
Cloudflare Tunnel is a simple yet powerful tool that turns any spare laptop or office PC into a secure backend server.
No port forwarding. No SSL hassle. No public IP exposure.
If you’re a small or budget-conscious team that wants to test and deploy fast —
this is arguably the easiest, safest, and most cost-effective setup you can build.
Tags: Cloudflare, DevOps, Backend Development, Self-hosted, Free Tools