- Yes, you can use your internet domains
- No more complaint on browser warnings as ‘not secure’
- Web server, telnet, ssh, sftp, you name it
- Set up your network to work on ‘any’ OSes
Nowadays, cloud services are everywhere. There are a lot of competitions among cloud service providers. Some companies provide even free credit to try and get into their services. However, when it comes to service plans, there are no such things as ‘free services forever’. So, you are going to pay eventually in one way or another. If you are using just for testing or playing around personally, you may feel like too much to pay.
Before get started
This post is just to share how to set up your home server in more realistic uses in general. There is a great article that I found ‘Should You Run A Server At Home? Cost & Benefit Compared’ if you haven’t considered the pros and cons yet.
There are various Internet Service Providers(ISP) in the market. They may or may not allow you to host anything on your home computers even if it is personal use. You may want to check the terms and conditions of your ISP.
Why don’t you use a NAS?
Just for accessing your own data, Network Attached Storage (NAS) would be a great option as they provide the so-called ‘cloud feature’. But there are still some limitations and/or issues with reliability — I’m still using them for other proposes.
So, this is just my short journey to find a bit more stable, convenient way of to set up a home server. And, it is for free. — There could be even better ways to get to the same goal. Any comments would be appreciated.
Install OS on a left-over computer

First, you need a left-over computer to be used as a home server. I found an ‘old’ DELL laptop from my drawer, which had really noisy HDD, and I replaced it with a reasonably cheap 128GB SSD (about $30 at the moment). I prefer laptops over the desktop as they come with a battery and fewer power consumptions. When a sudden power outage happens, it stays up for a while at least.
I downloaded and installed Ubuntu 18.04 for this time, but you can use any OS — Windows, Mac, or even Raspberry Pi. There are some different steps to configure them as home servers as below.
Open Ports in the OS Firewall
Allow receiving incoming data from the network
Most of the incoming data from other computers are NOT allowed to come in by default due to security reasons — as far as I can tell, all ‘modern’ OSes, but I’m not sure.
As an example, for a web server, in order to allow incoming TCP packets, TCP port 80 (HTTP) and 443 (HTTPS) should be opened from its own firewall.
For Ubuntu (my case), run the following command in the console.
$ sudo ufw allow http
$ sudo ufw allow https
For Windows 10, please check the instruction in the link in the wikihow site. For Mac OSX, there are slight variations depending on the OS versions, which is covered in Apple.
Setup Port Forwarding
Allow your network to route incoming data to reach your computer
Home network router also should accept HTTP and HTTPS packets and deliver to the home server, my case the Linux laptop. This is called port forwarding.
If your ISP provides a modem (or router) with built-in NAT feature (most of them are) and you don’t have your own router, please refer to the instruction manual or help in the administrator login of the modem (or router) to find out how to set ‘port forwarding’. In general, the setup should be like the following.
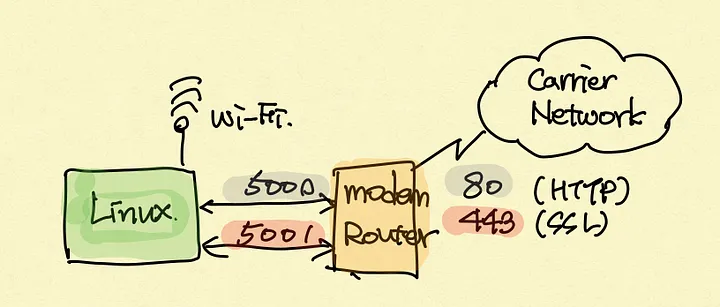
Incoming data from outside on the port 80, 443 is to be forwarded to the home server into 5000, 5001 in my case.
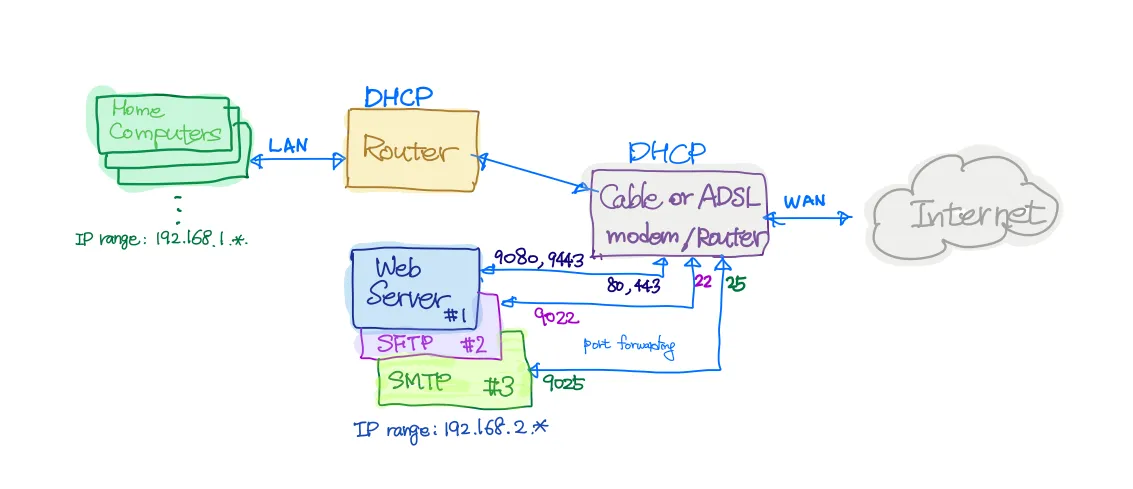
The following is an illustration of the port forwarding of three servers (web, FTP, and email server). The network traffic coming from the port 80 and 443 is forwarded to 9080 and 9443 into the home server for the webserver. And, for SSH and SFTP incoming 22, 25 is forwarded to 9022, 9025.
Dynamic DNS
Because I want my home server can be found by my domain name (something like ‘mydomain.info’), I need setup Dynamic DNS (DDNS).
Your home IP address (to be exact, public IP address) is getting changed when you are disconnected and reconnected or your ISP wanted to update it. Dynamic DNS is to catch the IP address changes, then update it to the IP address of your domain name. So, you can always access your home server by the domain name ‘mydomain.info’ from outside.
There are some domain service providers to allow DDNS within their DNS services with additional fees. I found Google Domains is comparably easy to set up and quite stable. And of course, it is free so long as your domain is registered under their services. Here is the Google Domains Dynamic DNS setup.
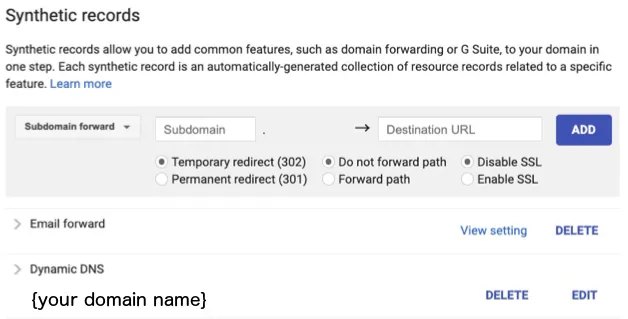
They provide not only free DDNS service but also give additional layers of privacy protection for free, which means there is less chance to get spam emails.
What kind of server to host?
All set up for ‘network’ is done. Now, it is time to pick up which server I want to run on the home server. As you expect, I already opened the ports for web, ssh, sftp, it is time to set up these servers. There are many resources to cover the installation of those servers, I simply followed the steps in the links below.
- Apache installation guide
- IIS installation getting started
- OpenSSH installation on Ubuntu
LetsEncrypt : Free SSL Certificate
I think, there is one thing in common for all servers set up, secure connections with SSL certificate.
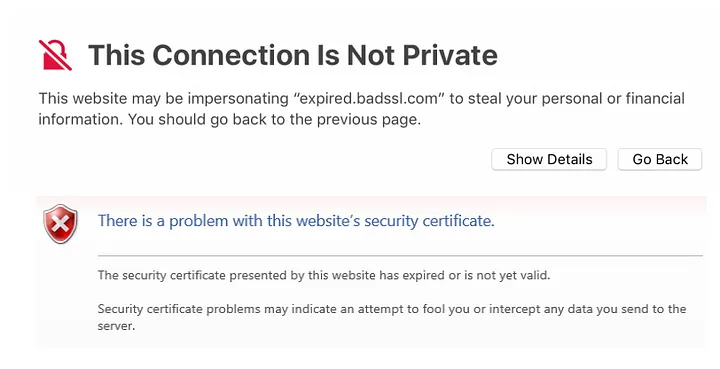
If you host your web server without proper SSL connection (or self-signed certificate), you would see familiar warnings from the browsers.
For SSH or SFTP services, you can make the connection more secure using an SSL certificate.
LetsEncrypt is an open-source project to create a free SSL certificate, managed by Linux Foundation. You can follow the instruction on how to set up and renew the SSL certificate.
SendGrid: Free emails to your targets

We all hate spam emails! However, if you have your own blog or back-end service, and you want to send out newsletters ‘occasionally’ to your subscribers, you will need some email services. SendGrid is one of the innovative email service providers out there, as the moment that I’m writing (Dec. 2019), they offer free service up to 100 emails per day. Hosting your own SMTP server should not be considered as a good option in many ways.
If you want to run a home server for any reason, and it is not mission-critical in any way such as for studying or testing, I think, they are perfect for those needs.
If you find more useful tips or not correct, please feel free to have a comment.